To project from view in Blender, select the object, press “G” to move it, then press “Z” to lock the movement to the Z-axis. Next, hold down “Ctrl” to snap the object to the view.
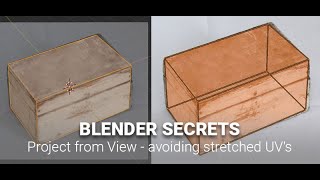
Are you looking to project from view in Blender? This technique allows you to flatten an object based on the current view, which can be useful for texturing or modeling. We will explore the step-by-step process of how to project from view in Blender, providing you with the skills needed to incorporate this useful tool into your 3D design workflow.
Whether you’re a beginner or an experienced Blender user, mastering this feature can enhance the precision and efficiency of your projects. Let’s delve into the details and elevate your Blender skills.

Credit: www.udemy.com
Importance Of Projection Techniques
Introductory paragraph about the ‘Importance of Projection Techniques’
Projection techniques play a crucial role in 3D modeling by allowing artists to accurately map and manipulate 2D images onto 3D objects. Understanding the various types of projections and when to use them is essential for achieving realistic and visually appealing results. In this article, we will delve into the significance of projection techniques in Blender and explore the different types of projections available, along with their practical applications.
H3 heading: Understanding the role of projection in 3D modeling
Understanding The Role Of Projection In 3d Modeling
Projection in 3D modeling involves the process of applying textures, images, or patterns onto 3D surfaces to simulate the appearance of real-world objects. It is a fundamental aspect of creating visually compelling and detailed 3D models. By using projection techniques, artists can achieve greater realism and depth in their designs, enhancing the overall visual impact of their work.
H3 heading: Different types of projections and when to use them
Different Types Of Projections And When To Use Them
There are several types of projections used in 3D modeling, each suited for different purposes. Some common types include:
- Planar Projection: Ideal for applying textures to flat surfaces.
- Spherical Projection: Perfect for mapping textures onto round or spherical objects.
- Cylindrical Projection: Suited for wrapping textures around cylindrical shapes.
- UV Mapping: Enables precise control over the placement of textures on complex surfaces.
Understanding when to use each type of projection is essential for achieving the desired visual effect and ensuring that textures align seamlessly with the geometry of the 3D model.
Setting Up For Projection
Setting up for projection in Blender is essential to ensure that your project is executed seamlessly. By preparing your Blender scene and carefully choosing the right view, you can set the stage for a successful projection. In this section, we will explore the crucial steps for preparing your Blender scene for projection and selecting the optimal view for your project.
Preparing Your Blender Scene For Projection
Before diving into the projection process, it’s essential to set up your Blender scene efficiently. Follow these steps to prepare your scene for projection:
- Organize your 3D objects and ensure they are positioned appropriately within the scene.
- Check the lighting and material settings to guarantee that they complement the projection outcome.
- Verify that there are no obstructions or distractions within the scene that could impact the projection.
Choosing The Right View For Your Project
After preparing your scene, the next step is to choose the ideal view for your projection. Consider the following factors when selecting the right view:
- Angle: Assess various angles to determine the most visually appealing perspective for your projection.
- Composition: Ensure that the composition of the scene aligns with the desired outcome of the projection.
- Visibility: Confirm that the chosen view provides clear visibility of the projected elements.
Utilizing Blender’s Project From View
Utilizing Blender’s Project from View feature is a powerful technique that allows artists and designers to efficiently project textures onto 3D models in Blender. Whether you’re working on character modeling, architectural visualization, or game development, mastering this tool is essential for achieving realistic and visually compelling results.
Step-by-step Guide To Projecting Textures
Here’s a step-by-step guide to effectively utilizing Blender’s Project from View feature:
- Select the 3D model or mesh you want to project the texture onto.
- Enter Edit Mode by pressing Tab.
- Adjust the model’s orientation to the desired camera view by pressing NumPad 1, 3, or 7 for front, side, or top views respectively.
- Select the faces of the model where you want to project the texture.
- Open the UV Editing workspace by clicking on the UV Editing tab in the top-left corner.
- Unwrap the selected faces by pressing U and choosing Project from View (Bounds) from the menu.
- Import the texture you want to project and position it in the UV Editor according to the desired projection.
- Exit Edit Mode and you will see the applied texture projected from the chosen view onto the 3D model.
Troubleshooting Common Issues With Projection
Although Blender’s Project from View feature is extremely powerful, it can sometimes present challenges. Here are some common issues and their solutions:
- Texture stretching: Ensure proper UV unwrapping and adjust the model’s geometry for better texture projection.
- Blurring or pixelation: Use high-resolution textures and ensure proper UV scaling.
- Incorrect orientation: Check the camera view and the model’s orientation to ensure the correct projection angle.
- Seams or gaps: Seamlessly blend the projected textures by utilizing Blender’s painting tools and a seamless texture set.
Enhancing Your Projection Skills
Tips And Tricks To Refine Projections
Refining your projection skills can significantly elevate the quality of your Blender projects. By incorporating advanced techniques and best practices, you can achieve more realistic and visually compelling results.
- Understand your scene: Before you start projecting, make sure you have a clear understanding of your scene and the specific areas that require projection. Analyzing the lighting, textures, and overall composition will help you make informed decisions during the projection process.
- Utilize reference images: Gathering reference images related to your scene can be invaluable. Study these references to gain insight into how light and textures interact in real-world settings, and apply this knowledge to your projections.
- Experiment with different projection modes: Blender offers various projection modes, such as “View,” “Window,” and “Bounding Box.” Experimenting with these modes can help you find the most suitable option for each projection task.
How To Use Modifiers And UV Maps Effectively
Modifiers and UV maps play a crucial role in refining projections and ensuring seamless integration with your 3D models. Understanding how to effectively utilize these tools will enhance the accuracy and realism of your projections.
- Apply modifiers strategically: When working with complex geometry, applying modifiers such as “Subdivision Surface” or “Solidify” can optimize the surfaces for projection. Experiment with different modifier combinations to achieve the desired results.
- Unwrap UV maps accurately: Properly unwrapping UV maps is essential for precise texture projection. Take the time to create clean and organized UV layouts that align with the geometry of your models, ensuring minimal distortion and maximum detail retention during projection.
- Utilize UV seams efficiently: Strategically placing UV seams can facilitate the projection process, allowing you to control how textures are applied to different parts of the model. Carefully plan and optimize UV seam placement for improved projection outcomes.
Complex Projections And Blender Tools
When it comes to complex projections and utilizing Blender’s advanced tools, understanding how to work with multiple projections and making the most of the software’s capabilities is essential. In this section, we will delve into the intricacies of working with multiple projections and utilizing Blender’s advanced tools for superior results.
Working With Multiple Projections
When working on complex projects, it’s crucial to have a firm grip on how to manage multiple projections effectively. By leveraging Blender’s intuitive interface and powerful features, users can seamlessly handle multiple projections with ease. This enables artists and designers to create intricate scenes with precision and accuracy.
Utilizing Blender’s advanced tools, such as its robust camera and lighting systems, enables users to manage multiple projections seamlessly. By understanding how to manipulate these tools, content creators can achieve superior results in their projects.
Utilizing Blender’s Advanced Tools For Superior Results
Blender offers a myriad of advanced tools that can elevate the quality of projections and enhance the creative process. Leveraging advanced features like the UV unwrapping tools and the powerful node-based shader editor, artists can achieve exceptional results in their projects.
- UV Unwrapping Tools: Blender provides a range of efficient UV unwrapping tools that enable users to effectively unwrap and manipulate models, facilitating the projection process.
- Node-Based Shader Editor: By harnessing the node-based shader editor, artists can create complex materials and textures, elevating the visual quality of their projections.
- Camera and Lighting Systems: Blender’s advanced camera and lighting systems empower users to fine-tune projections and achieve superior visual outcomes.
Understanding how to leverage these advanced tools not only streamlines the projection process but also leads to unparalleled results, setting projects apart in terms of visual impact and quality.
Frequently Asked Questions Of How To Project From View Blender
How Do You Unwrap A Viewport In Blender?
To unwrap a viewport in Blender, select the object, go to the UV editor, press ‘U’, and choose the unwrapping method.
How Do You Unwrap A Uv View?
Carefully select the UV view in your software. Find the UV editor and select the unwrap option. Use the appropriate tools to adjust the UV mapping. Ensure the UVs are laid out correctly. Make necessary adjustments to the UV map as needed.
How Do You Unwrap A Cube In Blender?
To unwrap a cube in Blender, select the cube object, go to the UV Editing workspace, press U and choose Unwrap. Then, you can further adjust the UV layout as needed.
What Is The Difference Between Conformal And Angle Based?
Conformal mapping preserves angles, while angle-based mapping does not. Conformal mapping maintains the shape and size of angles in a transformed region, providing accurate angular representations. The angle-based mapping may distort angles, resulting in less precise angular measurements during transformations.
Conclusion
Mastering the art of projecting from view in Blender can elevate the quality of your 3D designs. By understanding the detailed process and practicing consistently, you can bring depth and realism to your projects. Embrace the potential of view projections and unlock new dimensions in your creations.